移动自动化测试Appium之架构

Appium是一个优秀的开源移动自动化测试框架,其封装了android UiAtomatorios UIAutomation原生技术,提供统一的web driver接口访问两大移动平台的UI元素,还提供各种语言的driver client和测试工具,方便测试用例的开发和调试。

Appium自2013年发布以来,几乎每隔1-2个月就有一个新版本发布,目前最新的稳定版本为1.4.13(见此链接)。关于其名字由来,还和selinium有关,selinium是一个web平台上自动化测试框架,创始人Dan Cuellar和Jason Huggins取名appium,意思是希望能够像selinium一样,提供面向移动app的自动化测试框架标准,实际上Appium也已经成为当前移动平台自动化的事实标准。

Appium的架构图


Appium架构图


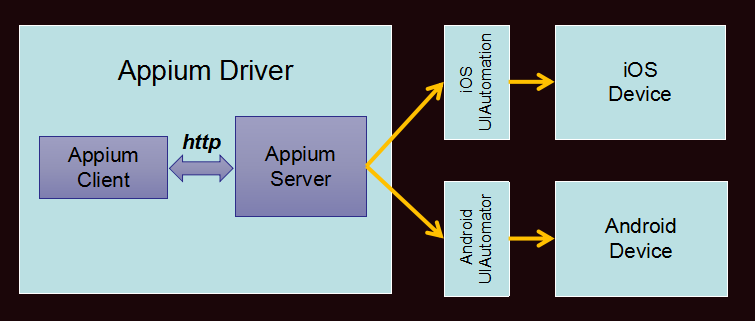
图中,Appium Server提供了符合web driver规范的自动化接口,Client通过Http协议和server进行通讯和进行各种自动化操作,包括建立自动化session,获取元素,点击、滑动和截屏等等,Client有各种语言的实现版本,比如Java\Python\Ruby\JavaScript\Object C\PHP\C#(.NET),RobotFramework也有对其的支持。

Appium作为一个移动自动化测试框架,不仅仅简单地提供driver,还为UI自动化提供各种工具,比如带有GUI界面的Appium Server,用于调试定位UI元素的Appium Inspector,以及丰富的Appium Client类库。

1)Appium Server GUI

为了方便让用户快速配置Appium server driver所需要的信息,Appium提供了具有UI界面的配置运行工具,如图所示,

appium_gui

在这里,可以方便的配置appium server driver所需要的各种信息,例如app 安装包,android/ios的运行版本,服务器端口等等。

2) Appium Inspector

在通过Appium  GUI启动Appium Server之后,可以点击界面上的放大镜按钮来启动Appium inspector。这个工具可以很方便查看和定位App上的UI元素,还具有测试用例录制的功能。

appium_inspector

3) Appium Client类库

Appium Client封装了和driver交互的各种操作,不仅如此,它还提供了PageFactory类,用于对page object  pattern的支持,我们可以通过注解的方式同时定义同一App UI元素在android和iOS上的查询locator,

@iOSFindBy(xpath = "//xpath/")
@AndroidFindBy(id = "start_btn")
private WebElement startButton;

测试用例在运行的时候,appium client会自动根据driver类型自动选择和设备对应的locator来寻找UI元素,这样就可以方便的分离出单独的UI层,然后可以写出同时跑在android和iOS设备的同一测试用例。


参考链接

1. appium官网:http://appium.io/introduction.html

Linux常用命令之curl

curl命令是linux系统自带的轻量级远程访问工具,支持的通信协议有http, ftp, telnet等,下面将以最常见的几种http使用方法进行介绍。

1. 下载一个网页并保存为一个文件

curl http://www.baidu.com >> index.html

curl -o index.html http://www.baidu.com

2. 使用-O这个选项时,需要具体到网页

curl -O http://www.baidu.com/index.html

3. 显示下载进度条

curl -# -O http://www.baidu.com/index.html

4. 下面为轮询下载,curl会尝试下载test1.jpg,test2.jpg和test3.jpg三个图片。

curl -O http://www.baidu.com/test[1-3].jpg


5. curl上传图片到ftp服务器

curl -T test.jpg -u user:password ftp://www.myweb.com/img/

6. 发送一个POST请求,并使用用户名登录

curl -X POST -u user:password http://www.baidu.com

7. 获取http返回值

curl -X GET -o /dev/null -s -w %{http_code} http://www.baidu.com

其中-o /dev/null是关闭输出选项。

8. 指定curl在规定内时间完成http请求

curl -X POST  http://www.baidu.com --connect-timeout 10 -m 10

其中connect-timeout指定连接时间为10秒,数据最大传输时间为10秒,超时报错。

9. 指定代理服务器

curl -x 192.168.1.100:8888 http://www.baidu.com

10. 保存连接的header信息到文件

curl -D ./header.txt http://www.baidu.com

除此之外,curl还有很多使用方法,这里就不一一介绍了。

国内的开发资源镜像

在中国做开发工作,有绕不开的墙,即使能翻墙,还要走国际网络,速度慢,幸运的是国内各大互联网公司无私的提供各种开发资源镜像,下面是一些常用的开发资源镜像及其使用配置。

1. maven仓库

开源中国社区:http://maven.oschina.net/help.html

对maven的settings.xml配置如下,

<settings xmlns="http://maven.apache.org/SETTINGS/1.0.0"
 xmlns:xsi="http://www.w3.org/2001/XMLSchema-instance"
 xsi:schemaLocation="http://maven.apache.org/SETTINGS/1.0.0
 http://maven.apache.org/xsd/settings-1.0.0.xsd">
 <localRepository/>

 <mirrors>
   <mirror>
     <id>nexus-osc</id>
     <mirrorOf>*</mirrorOf>
      <name>Nexus osc</name>
      <url>http://maven.oschina.net/content/groups/public/</url>
   </mirror>
 </mirrors>

 <profiles>
   <profile>
     <id>jdk-1.4</id>
     <activation>
       <jdk>1.4</jdk>
     </activation>
     <repositories>
       <repository>
         <id>nexus</id>
         <name>local private nexus</name>
         <url>http://maven.oschina.net/content/groups/public/</url>
         <releases>
           <enabled>true</enabled>
         </releases>
         <snapshots>
           <enabled>false</enabled>
         </snapshots>
         </repository>
       </repositories>
       <pluginRepositories>
          <pluginRepository>
            <id>nexus</id>
            <name>local private nexus</name>
            <url>http://maven.oschina.net/content/groups/public/</url>
            <releases>
                <enabled>true</enabled>
           </releases>
           <snapshots>
              <enabled>false</enabled>
          </snapshots>
          </pluginRepository>
       </pluginRepositories>
   </profile>
 </profiles>

 <activeProfiles>
   <activeProfile>jdk-1.4</activeProfile>
 </activeProfiles>
</settings>

更多配置可以参考帮助文档

2. 淘宝npm镜像

https://npm.taobao.org/

使用的话,可以选择使用淘宝定制的cnpm,先安装cnpm,然后用cnpm安装各个npm应用。

npm install -g cnpm --registry=https://registry.npm.taobao.org
 cnpm install app_xxx

或者直接在npm命令后添加应用源参数,

npm --registry=https://registry.npm.taobao.org install app_xxx

或者直接修改npm的配置,

npm  config set registry "https://registry.npm.taobao.org"
 npm config list #查看配置列表
 npm install app_xx
3. Ruby Gems

淘宝的Ruby Gems镜像:https://ruby.taobao.org/

gem sources --add https://ruby.taobao.org/ --remove https://rubygems.org 
 gem sources -l
4. Android sdk

东软信息学院:http://mirrors.neusoft.edu.cn/

启动android sdk manager,打开主界面,进入Android SDK Manager -Settings,输入如下信息,

1. HTTP Proxy Server: mirrors.neusoft.edu.cn

2. HTTP Proxy Port: 80

3. 选中「Force https://... sources to be fetched using http://...」复选框

配置详细步骤请参见这里

5. Python PyPI 源

可以使用豆瓣源:  http://pypi.douban.com/simple

配置方法一,在命令中直接指定下载源,

pip install app_xxx -i http://pypi.douban.com/simple

配置方法二,就是修改pypi的在用户目录中配置文件(linux的文件在~/.pip/pip.conf,windows在%HOMEPATH%\pip\pip.ini)

[global]
 index-url = http://pypi.douban.com/simple
6. Ubuntu/CentOS/Debian

阿里提供的镜像源:http://cn.archive.ubuntu.com/help/ubuntu

网易提供的镜像源:http://mirrors.163.com/

详细配置方法参见各个镜像源的帮助文档。

各个国内公司提供的镜像源地址

网易:http://mirrors.163.com/

阿里:http://cn.archive.ubuntu.com/

淘宝:https://ruby.taobao.org/, https://npm.taobao.org/

东软:http://mirrors.neusoft.edu.cn/

豆瓣:http://pypi.douban.com/simple